Full Guide to Software Packages (Creating & Editing)
Step-by-step instructions on how to create a new software package, update an existing one, and utilize script templates. #MC-KB23
Estimated reading time: 17 minutes, 24 seconds.
This is a full article to guide you on updating a version of the software package published in our ThinScale portal or creating packages using the product prior v7.x. The support team will only assist with special requests requiring deep troubleshooting from the SRW/TK install behaviour. Please read the section that applies to you and take advantage of Step 3, which contains some template scripts.
In the v8 Cloud product, please expand the accordion below to learn how to convert a current software package (*.zip file) and upload the package to the Cloud portal.
DevicePortal_PackageCreator_8_1.msi
v8 Cloud Device Portal - Package Conversion
STEP 1: PACKAGE CONVERSION
1.1. Please download the new Software Package Creator utility above and install it.
1.2. Download the software package from our portal. Our software packages are in .zip format and usually contain a Readme.txt with the information on the path install and the process identity information.
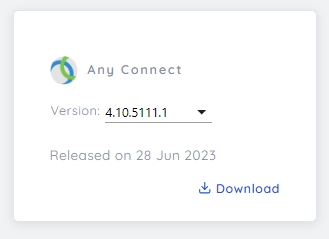
1.3. Open the Software Package Creator, click “Open Package,” and select the downloaded zip file.

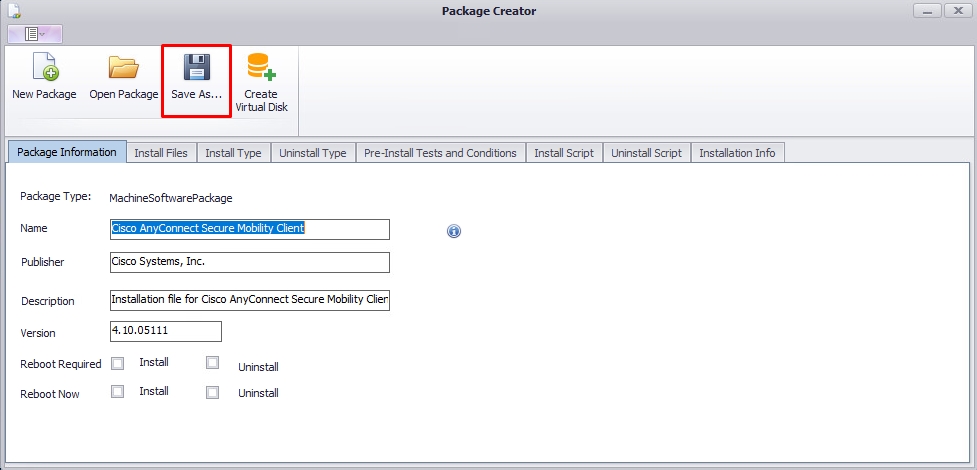
1.4. Click “Save As..” to convert the package from a .zip file extension to .pkg.
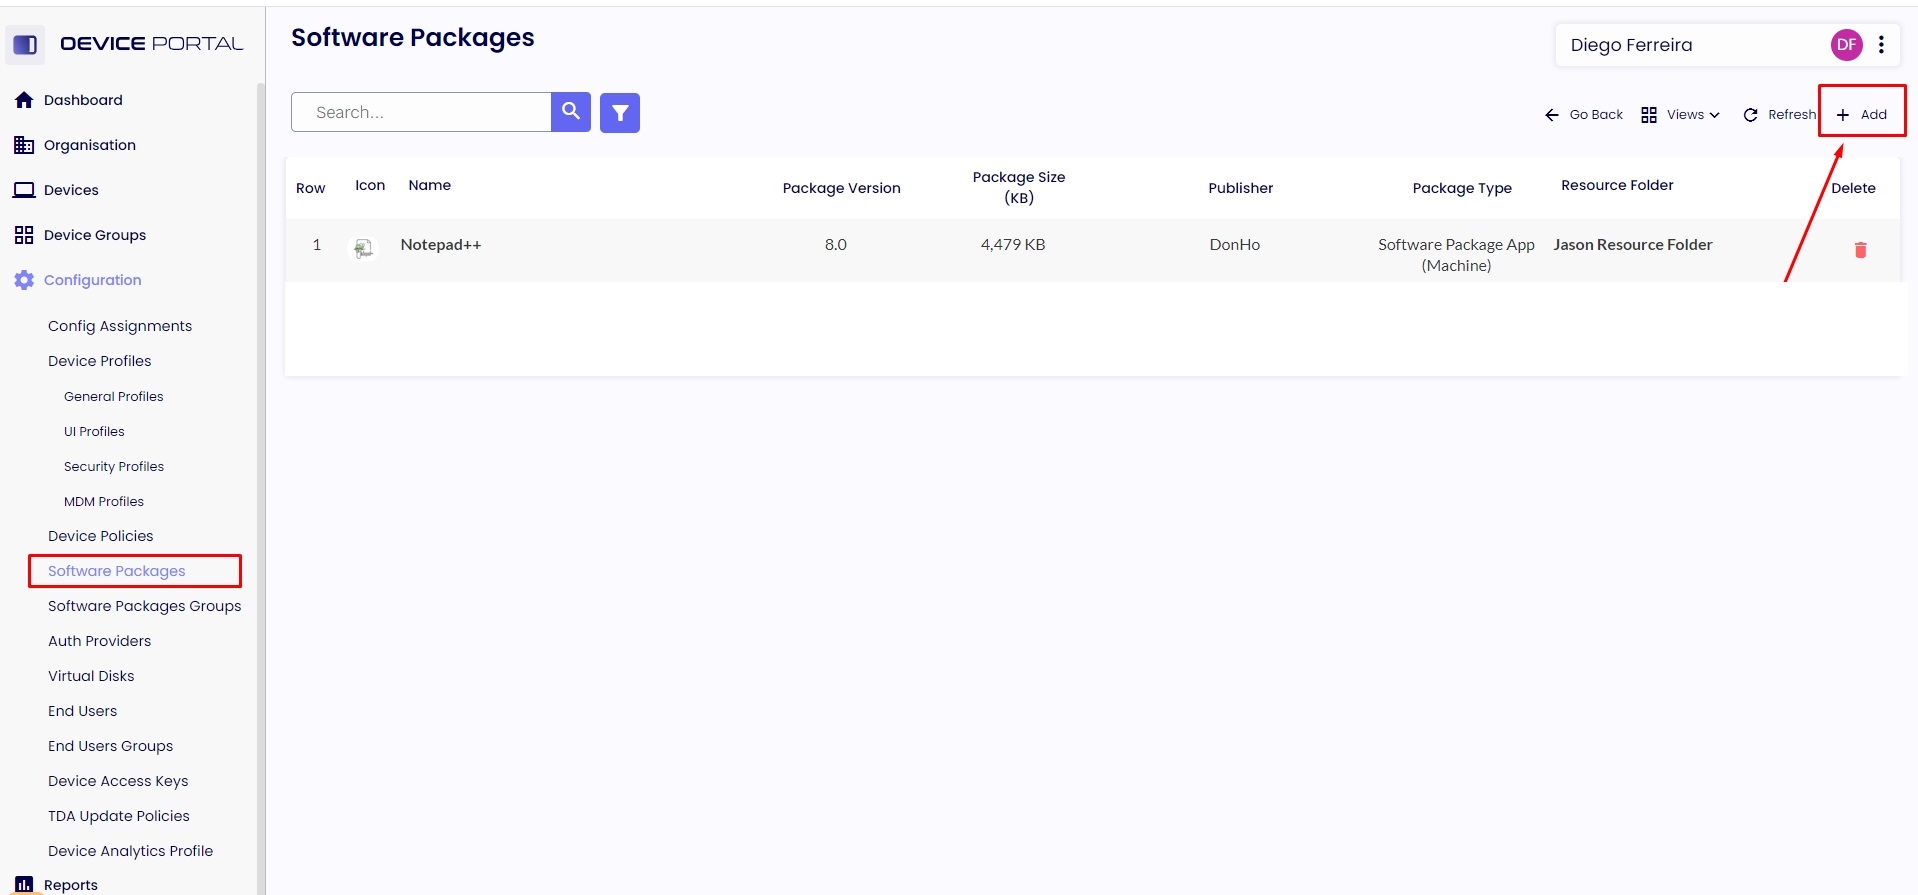
1.5. Sign in to your Cloud Portal and navigate to “Configuration" - “Software Packages” and click “Add” to import the package.
1.6. The next step is to “Save” the package imported.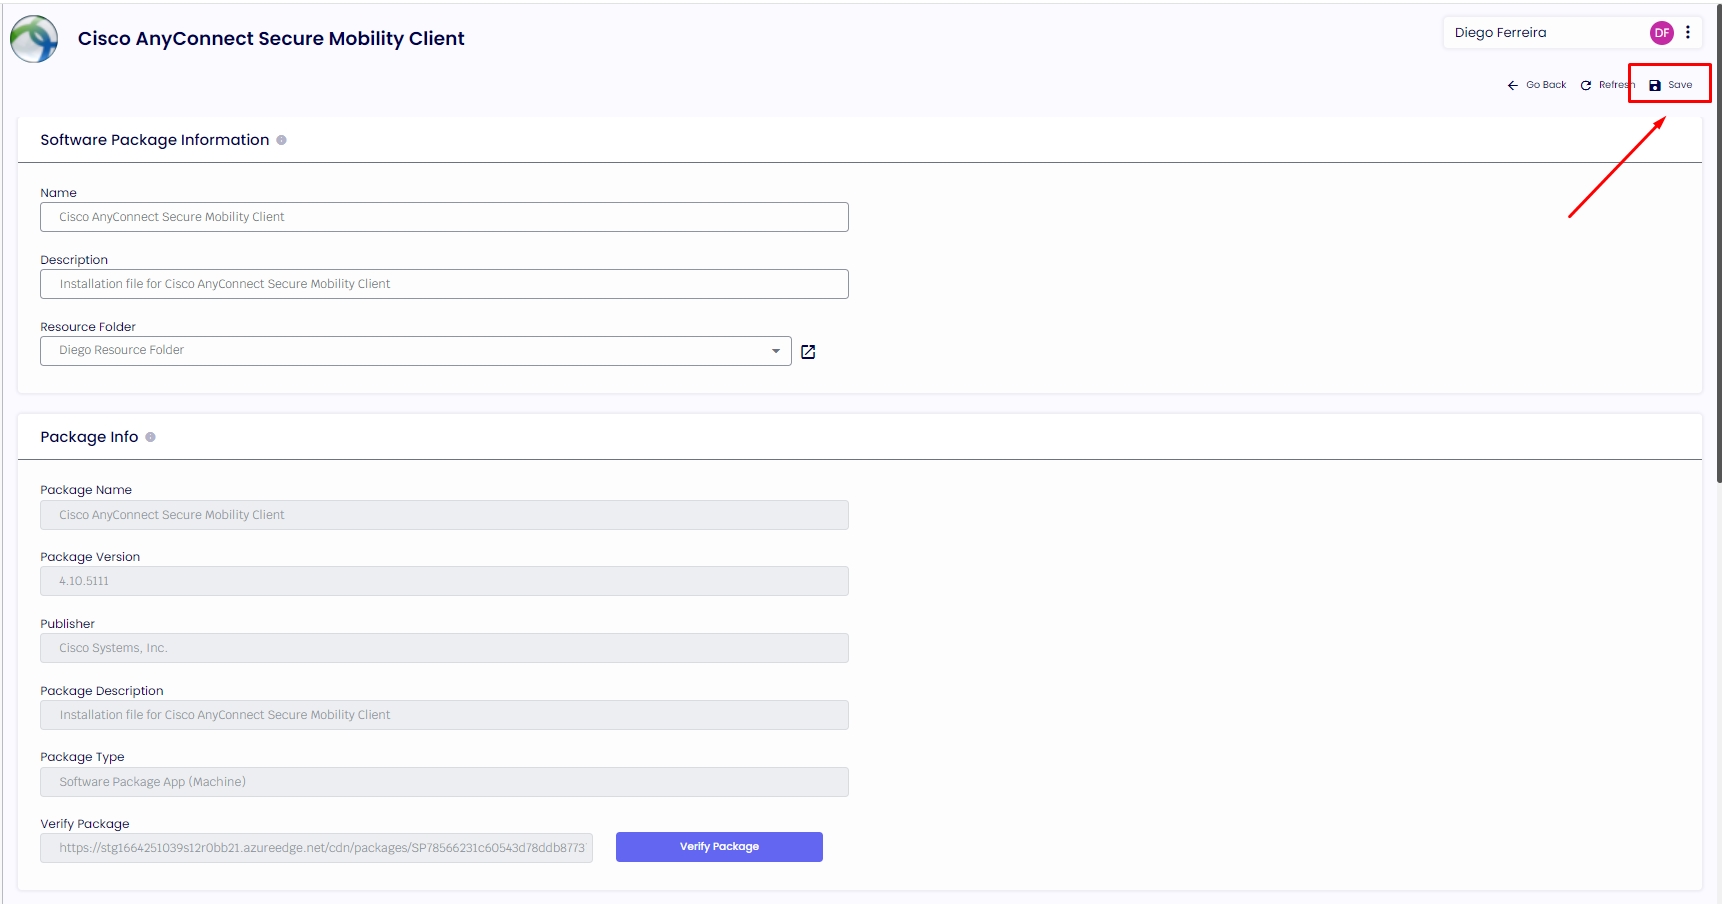
1.7. The package has been imported with success.

STEP 1 - Updating a current software package
STEP 2 - Creating a software package
STEP 3 - Templates/Scripts
Currently, our software packages can be created in VBS or PS. We do our best to publish the scripts in PowerShell only.
 Warning
Only client agents running minimum version v7.2 can read the PowerShell scripts. Before that version, you must use the VBS script, or those agents on the lower versions will not receive a successful installation of the package.
Identify the Agent Version
On the left side inside of your Management Console. Click on “Devices,” and it will display all machines.
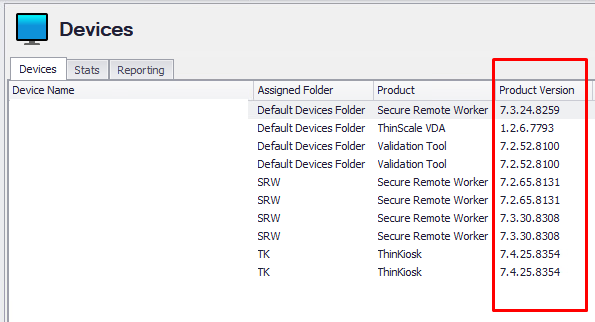
 Info
Info
Section Step 3 in this article Full Guide to Upgrade Server, Console, and End-Points will guide you step-by-step to upgrade the clients to the newest version we have released. Don't let your environment (server/console/agents) run old versions. Always keep your environment updated with the current versions released.
STEP 1: UPDATING A CURRENT SOFTWARE PACKAGE
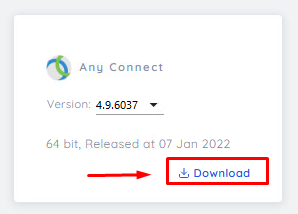
1.1. This article will use Cisco Anyconnect to explain the process. Download the software install from the vendor's website.
 Info
Info
NOTE: Unzip the file to access the *.MSI or *.EXE if the file is zipped.
1.2. Download the software package from our portal to be modified. Our software packages are in .zip format and usually contain a Readme.txt with the information on the path install and the AEP information.
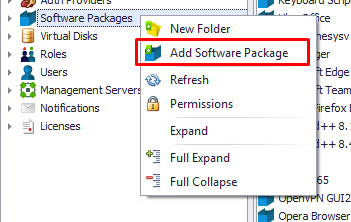
1.3. Import the software package into your console (if you don't have it present already). Right-click over "Software Packages" and click on “Add Software Package.”
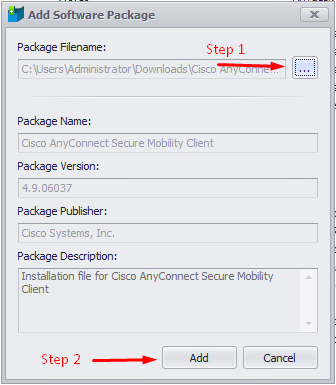
1.4. Expand your management console's "Software Packages" menu and locate your package. We're looking for the Cisco Anyconnect Secure Mobility Client in this scenario. Right-click over and select the option "Retrieve Package Information."
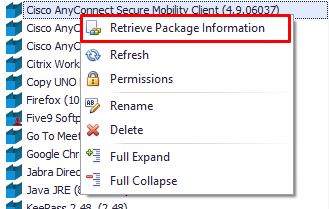
 Info
Info
NOTE: We always recommend manually installing the software on your lab computer to validate the information needed. For example, the software vendor can change the path where the application will be installed.
1.5. The package creator will load the package information. In the first tab, "Package Information," the "Name" field is the name displayed on your management console. In the field "Version," you can update with the new one you have from the vendor. In the scenario below, we updated the name and the version from 4.9.06037 to 4.10.05111.
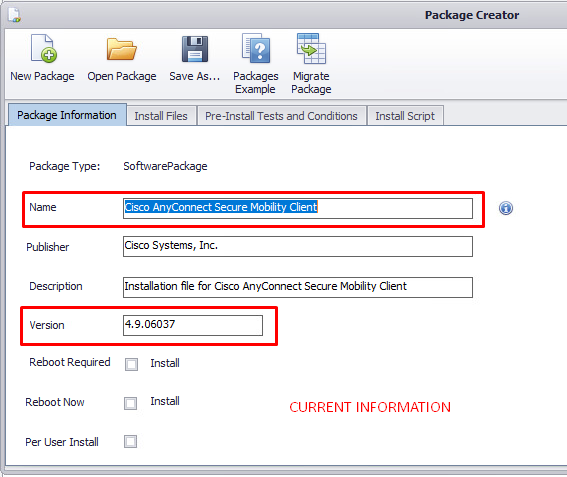
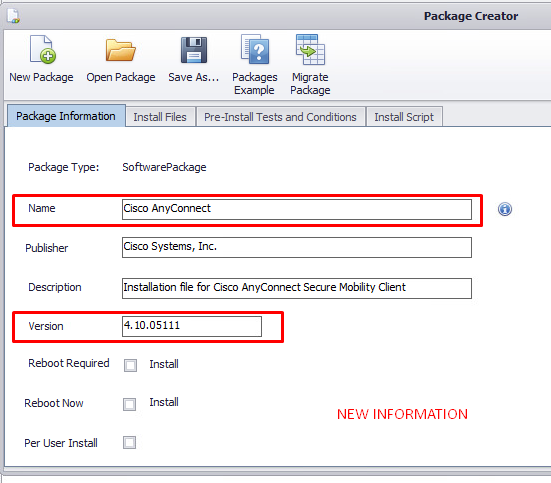
 Warning
This software package will be installed on the machine (ALL USERS). If you want the software installed only on the SRW user account, check the option “Per User Install.” The Cisco Anyconnect doesn't require a reboot of the machine; if your software requires it, enable the option “Reboot Required.”
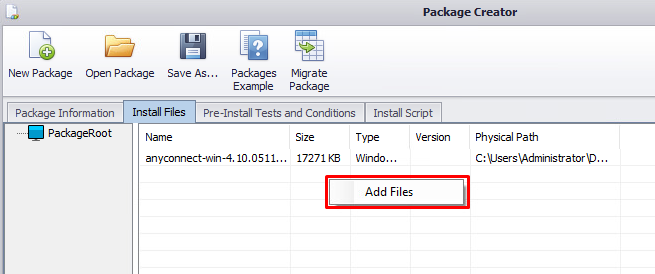
1.6. The following tab, "Install Files," is where the executable files will be stored. Right-click over the files and “Remove.”
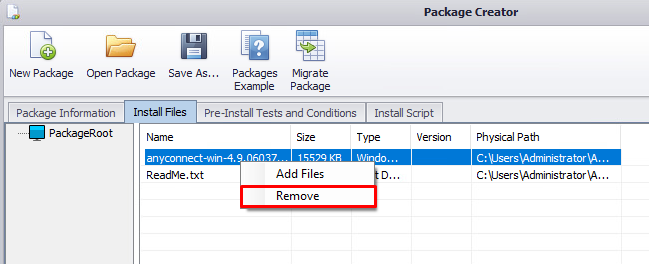
 Info
Info
You can remove the Readme.txt if you would like. It's two ways you can handle the Readme file here. If you have it ready, you can import the Readme.txt at this step or create the software package and manually import the *.txt inside of the zip file later.
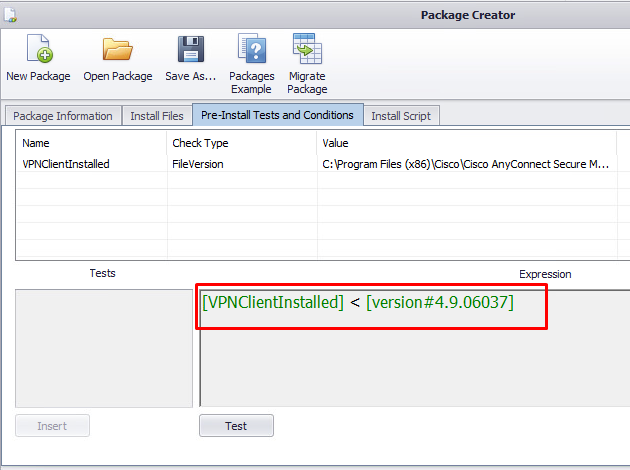
1.8. In the "Pre-Install Tests and Conditions tab," you will decide on the conditions to allow the script to run. You can validate using Registry - File - Device, and Script. The most common condition is to check the version of the file; for example, if it's less than the new one we have, the script will be allowed to run to install or upgrade the agent.
 Info
Info
It's common for a couple of vendors to release a new version saying the newest version is 4.9.05111, but the executable file itself is higher or less. We recommend manually installing it on your lab computer to collect the right information.
Right-click over the executable file and check the “Details” tab.

1.8.1. The picture below shows the current condition to check if the version is less than 4.9.06037.
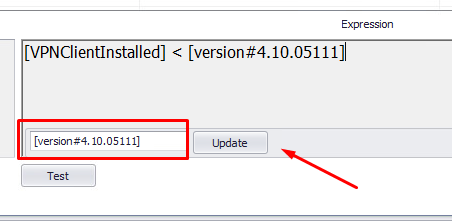
1.8.2. We will update the current version to 4.10.05111. Over the Expression area with the current version, double-click on the content, and a field will appear on the button. Add the new version and click "Update."
 Warning
If you don't set a condition, the script will run every time the application SRW/TK is launched.
 Info
Info
NOTE: If your installation needs to decide between x64 or x86. You need to add both files to the “Install Files” tab, add an expression condition below, and use a template script, which you can locate the script in Step 3 of this article.

For more information on utilizing && or || for multiple pre-test conditions, please reference the relevant section in our KB on Creating and Editing Software Packages
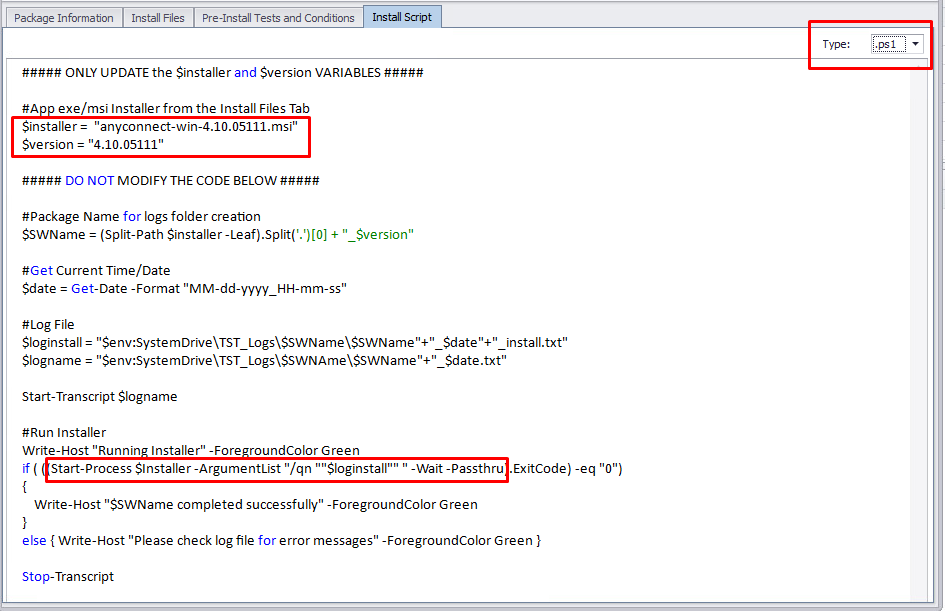
1.9. In the "Install Script" tab, verify whether the script runs in VBS or PS on the right side. We are doing our best to publish only scripts in Powershell. You can also update them to Powershell since we share the templates in Step 3.
1.9.1. For the scripts running PowerShell, you have to update only two variables to update.
$installer - The name must match the file you imported in Step 1.7.
$version - The version of the package Step 1.5.
 Info
Info
The script below uses the argument "/qn" which means a full silence install without the agent interaction and logs the install on the C:\TST_Logs\. You can add extra arguments if you would like after the “/qn”.
PowerShell Install Script Template in Silence Mode
##### ONLY UPDATE the $installer and $version VARIABLES #####
#App exe/msi Installer from the Install Files Tab
$installer = "anyconnect-win-4.10.05111.msi"
$version = “4.10.05111”
##### DO NOT MODIFY THE CODE BELOW #####
#Package Name for logs folder creation
$SWName = (Split-Path $installer -Leaf).Split('.')[0] + “_$version”
#Get Current Time/Date
$date = Get-Date -Format “MM-dd-yyyy_HH-mm-ss”
#Log File
$loginstall = "$env:SystemDrive\TST_Logs\$SWName\$SWName"+"_$date"+"_install.txt"
$logname = "$env:SystemDrive\TST_Logs\$SWNAme\$SWName"+"_$date.txt"
Start-Transcript $logname
#Run Installer
Write-Host "Running Installer" -ForegroundColor Green
if ( ((Start-Process $Installer -ArgumentList "/qn ""$loginstall"" " -Wait -Passthru).ExitCode) -eq "0")
{
Write-Host "$SWName completed successfully" -ForegroundColor Green
}
else { Write-Host "Please check log file for error messages" -ForegroundColor Green }
Stop-Transcript
1.9.2. If you need to run the installer in VBScript because the agents are running a version before v7.2. Set the "Type" to “.vbs” and update the file name on the script. The name must match the file you imported in Step 1.7.

VBScript Template in Silence Mode
On Error Resume Next
Set objShell = CreateObject("WScript.Shell")
objShell.Run "msiexec.exe /i anyconnect-win-4.10.05111.msi /qn", 0, True
WScript.Quit()
 Info
Info
If you want the VBS to read a PowerShell script you created and imported on the “Install Files” tab. Please check Step 3 for the script code.
1.10. Click on "Save As..". The popup screen confirmation sometimes appears under the taskbar. You may need to click on that to appear on the front end. Please close the screen and accept the option to add (import) the new software package to the console.


1.11. Getting the AEP information for your Readme and/or profile configuration.
 Note
Note
Application Execution Prevention (AEP) is one of the most important functions in the profile and a critical component of the ThinScale security features set. Therefore, implementing it properly can play a key role in your organization, and ignoring it could have significant impacts. We strongly recommend and advise you to familiarize yourself before enabling it in production.
Please get in touch with the support team for a quick training session or read more at our AEP Best Practice KB article.
These are the Cisco Anyconnect Info:
Certificate Trusted Is: True
AND Certificate Issued To Is: Cisco Systems, Inc.
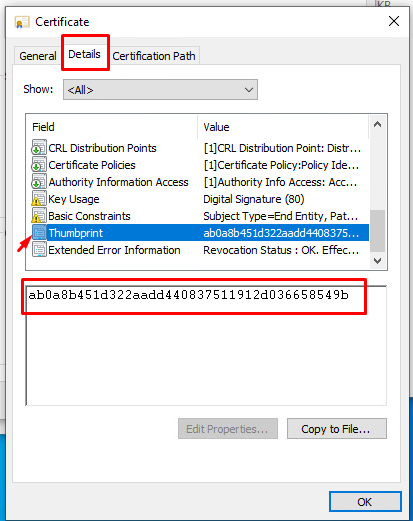
AND Certificate Thumbprint Is: AB0A8B451D322AADD440837511912D036658549B
Or Certificate Thumbprint Is: 612ABB699DA8BF75E58BD07ADD7DAF3130527902
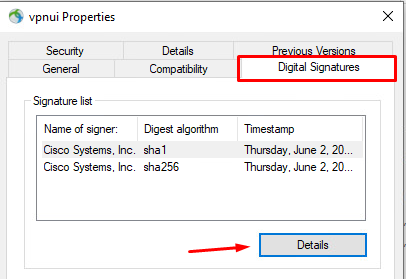
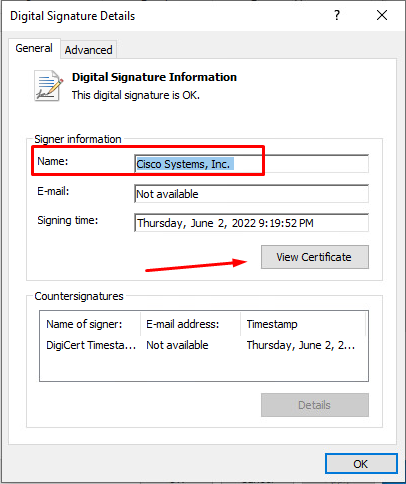
1.11.1 - You manually go to the "Digital Signatures" tab from the executable file's properties to access the certificate and extract the necessary information (Vendor's name, Thumbprint). This software has two certificates, so you need to get both thumbprints.
 Warning
The Application Execution Prevention (AEP) best practices setup are:
Certificate Trusted Is: True
AND Certificate Issue To Is: XXXXXXX
AND Certificate Thumbprint Is: XXXXXXXXXXXXXXXXXXX
Note: Some software doesn't have a certificate. In that case, we recommend you use the following best practices below:
Image Name Ends With \sample.exe
AND File Size Is XXXX
AND File Hash (sha256) Is xxxxxxxxxxx
If you need to use File Description as a condition, try adding extra conditions to secure it because an intruder can rename his file description with the same name.
1.11.2. If you have the software installed where the console is located, during the AEP rule setup in your profile, you can point to where the executable is located. Our management console will automatically extract that information for you (Vendor Name and Thumbprint).
1.11.3. We have a PowerShell script you can run on your lab, and it will extract that information for you.
 Info
Info
It's required to have the Powershell 7 installed on the machine.
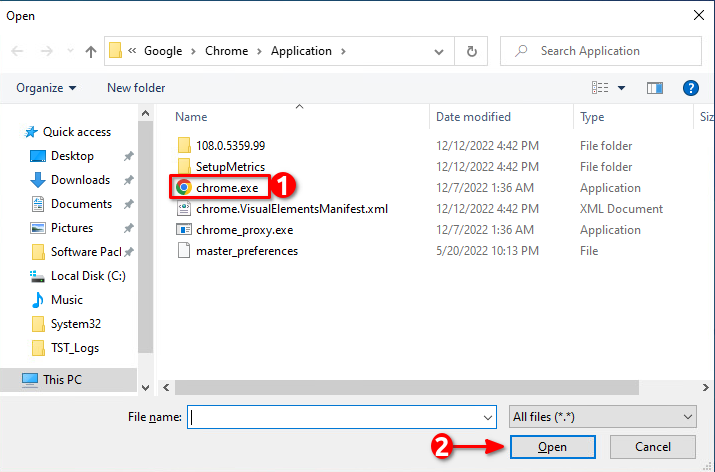
1.11.4. Run the script As “Administrator” in Powershell 7. The script will ask you for the location of the .exe file, once found, select it and click “Open.”
1.11.5. You will receive the following screen after opening the executable file.
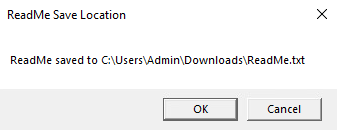
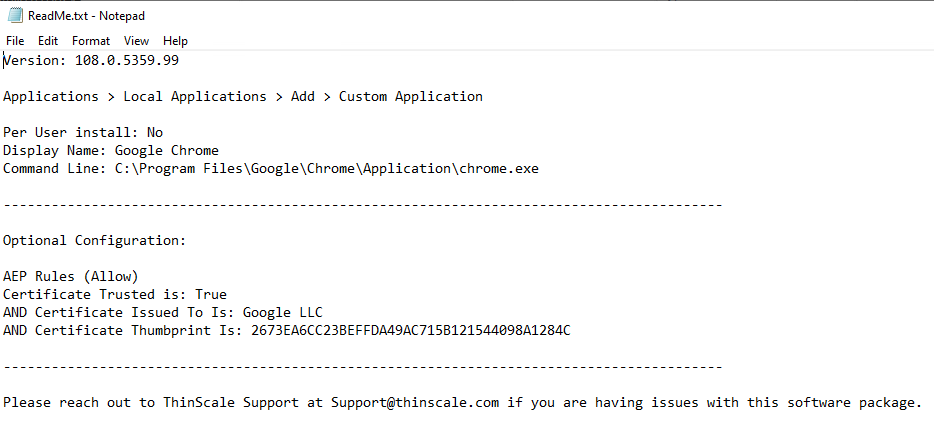
1.11.6. The Readme.txt file will be created in the Downloads folder, and the logs from the script are on C:\TST_Logs. The Readme will look like the picture below.
 Info
Info
When opening the ReadMe.txt file under Optional Configuration AEP Rules, please confirm the "Certificate Issued To Is" option has no extra characters like a blank space, double quotes, or an ending comma, as any of these extra characters can impact the performance of AEP in the profile.
AEP Readme Script
#Enabling VisualBasic Assembly
Add-Type -AssemblyName Microsoft.VisualBasic
#Get Current Time/Date
$date = Get-Date -Format "MM-dd-yyyy_HH-mm-ss"
#Logfile
$logname = "$env:SystemDrive\TST_Logs\ReadMe_Log"+"_$date.txt"
Start-Transcript $logname
#ReadMe Save Location
$readme = "$env:USERPROFILE\Downloads\ReadMe.txt"
#Vendor App Download URL
$vendorURL = [Microsoft.VisualBasic.Interaction]::InputBox('Please enter the Vendor App Download URL:', 'Vendor App Download URL')
#Select file name
Write-Host "Select the exe/msi file" -ForegroundColor Green
[System.Reflection.Assembly]::LoadWithPartialName("System.windows.forms") | Out-Null
$app = New-Object System.Windows.Forms.OpenFileDialog
$app.initialDirectory = $initialDirectory
$app.filter = "All files (*.*)| *.*"
$app.ShowDialog() | Out-Null
#Software details
$DisplayName = (Get-ItemProperty $app.FileName).VersionInfo.FileDescription
$msiexe = $app.SafeFileName
#Getting file version
Write-Host "Obtaining version for $msiexe" -ForegroundColor Green
$version = (Get-ItemProperty $app.FileName).VersionInfo.FileVersion
#Obtaining Certificate trusted
Write-Host "Checking if Certificate is Trusted for" $app.SafeFileName -ForegroundColor Green
if ((Get-AuthenticodeSignature $app.FileName).status -eq "Valid")
{
$trustcert = "True"
}
else { $trustcert = "No" }
#Obtaining "Issued to"
Write-Host "Obtaining Certificate Issued To for" $app.SafeFileName -ForegroundColor Green
$certissuedto = (((Get-AuthenticodeSignature $app.FileName).SignerCertificate.Subject -split ',*..=')[1]) -replace """"
#Obtaining Certificate Thumbprint
Write-Host "Obtaining Certificate Thumbprint for" $app.SafeFileName -ForegroundColor Green
$certthumb = (Get-AuthenticodeSignature $app.FileName).SignerCertificate.Thumbprint
#Creating ReadMe File
$cmdline = $app.FileName
if ($cmdline -like "C:\Program Files*")
{
$PerUser = "No"
}
else { $PerUser = "Yes" }
#$PerUser =[Microsoft.VisualBasic.Interaction]::MsgBox('Per User Install?', 'YesNo', 'Per User Install?')
#Creation of ReadMe file
Write-Host "Creating ReadMe file for" $app.SafeFileName -ForegroundColor Green
"** Application Version: **
$version
** Application Download Link: **
$vendorURL
If you would like to create your packages, or modify/upgrade existing ones with ease, feel free to access our
***Full Guide to Software Packages (Creating & Editing)***
>>>>>>>>> https://kb.thinscale.com/management-platform-knowledge-base/full-guide-to-software-packages <<<<<<<<<
---------------------------------------------------------------------------------------------------------------
To allow access from within ThinScale environment, please add the following parameters to your profile:
---------------------------------------------------------------------------------------------------------------
Please open profile editor, and go to:
Applications > Local Applications > Add > Custom Application
Per User install: $PerUser
Display Name: $DisplayName
Command Line: $cmdline
---------------------------------------------------------------------------------------------------------------
It is critical for the system security to utilize AEP, below is the recommended configuration for this app.
Additional conditions can only sthrenghten the level of protection:
---------------------------------------------------------------------------------------------------------------
AEP Rules (Allow)
Certificate Trusted is: $trustcert
AND Certificate Issued To Is: $certissuedto
AND Certificate Thumbprint Is: $certthumb
---------------------------------------------------------------------------------------------------------------
Please reach out to ThinScale Support at Support@thinscale.com if you are having issues with this software package." | Out-File -FilePath $readme
$okcancel = [Microsoft.VisualBasic.Interaction]::MsgBox("ReadMe saved to $readme", 'OKCancel', 'ReadMe Save Location'),[System.Diagnostics.process]::Start("explorer.exe","$env:HOMEPATH\Downloads")
Stop-Transcript
 Warning
When opening the ReadMe.txt file under Optional Configuration AEP Rules, please confirm the "Certificate Issued To Is" option has no extra characters like a blank space, double quotes, or an ending comma, as any of these extra characters can impact the performance of AEP in the profile.
11.12. The best practice is always to test the new software package in your lab environment before moving to production.
11.13. The instructions below will guide you through creating a temporary “test” folder and a copy from your production profile to upgrade your lab environment to the newest version of the client.
11.14 Right-click in "Devices" - "New Folder" - Type the folder name.
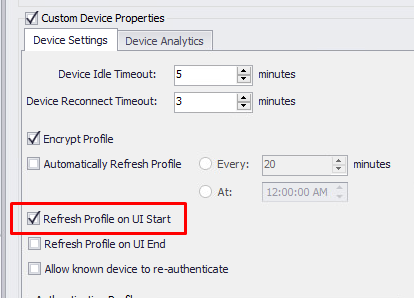
11.15. The option "Refresh Profile on UI Start" below should be already inherited from the "Default Device Properties," if not, please apply the same settings.
11.16. Go to the “Profiles” section, select your current profile, right-click over, and select “Copy Profile.” Type the new name. A new profile will be created.
11.17. Please right-click on the new profile, and go to the option on the left side menu called "Software Package Installation." Please select "Install packages when the ThinKiosk UI is launched" and Save it.
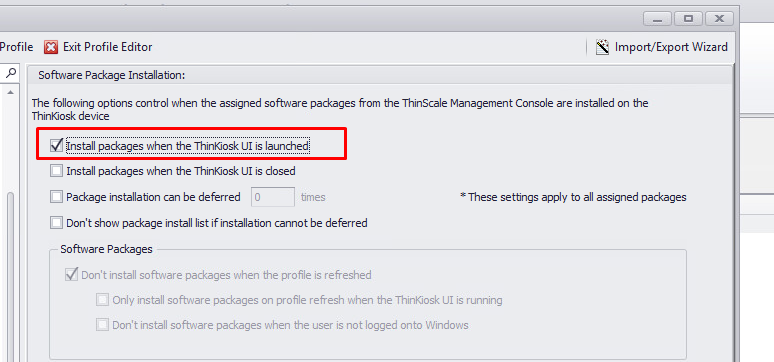
11.18. Go to the new folder created and assign the new test profile and the new software package we created. Please verify if other tabs require assigning Auth Providers or Virtual Disk in your environment.
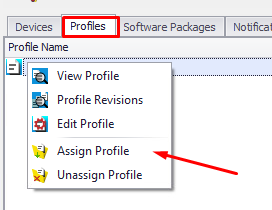
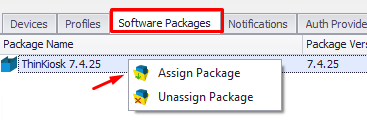
11.19. The folder is ready to receive a test client. Please assign your test machine to the folder, and the software will be upgraded on the next launch in "Silence Mode."
If your test machine upgrades successfully and your internal validation is approved to apply in production, go back to steps 11.15, and 11.17 on your current profile and assign the package to the production folder.
STEP 2 - CREATING A SOFTWARE PACKAGE
Creating a software package from scratch, you will use the same concept from STEP1 described above. Please take a minute and read the steps if you haven't done it yet. You can take advantage of and use the scripts from STEP3 if you wish. We have another KB (Creating & Editing) complementary to what you learned here. Both articles are essential to improving your knowledge skills.
STEP 3 - TEMPLATES/SCRIPTS
We are sharing a couple of templates and scripts you can use. Since it's a programming language, you can use your knowledge or check out specialized forums to improve or modify the scripts.
PowerShell Install Script Template in Silence Mode
##### ONLY UPDATE the $installer and $version VARIABLES #####
#App exe/msi Installer from the Install Files Tab
$installer ="SecureRemoteWorkerClient-7.4.37.msi"
$version = "7.4.37"
$args = '/QB'
#Package Name for logs creation
$PackageName = ($installer).Replace('.','')
#Get Current Time/Date
$date = Get-Date -Format "MM-dd-yyyy_HH-mm-ss"
#Log Files
$logname = "$env:SystemDrive\TST_Logs\$PackageName"+"_$date.txt"
#Run Installer
Start-Transcript $logname
Write-Host "Running Installer" -ForegroundColor Green
if ( ((Start-Process $Installer -ArgumentList $args -Wait -Passthru).ExitCode) -eq "0")
{
Write-Host "Installer completed successfully" -ForegroundColor Green
}
else { Write-Host "Please check log file for error messages" -ForegroundColor Green }
Stop-Transcript
PowerShell Script to validate 32-bit or 64-bit Install
##### ONLY UPDATE the $installer and $version VARIABLES #####
#App exe/msi Installer from the Install Files Tab
$installer_x86 = "GoogleChrome_x86.msi"
$installer_x64 = "GoogleChrome_x64.msi"
$version = "103.0.5060.134"
##### DO NOT MODIFY THE CODE BELOW #####
#Package Name for logs folder creation
if ( ( (Get-WmiObject -Class Win32_OperatingSystem | select *).OSArchitecture) -eq "64-bit")
{
$SWName = (Split-Path $installer_x64 -Leaf).Split('.')[0] + "_$version"
}
else { $SWName = (Split-Path $installer_x86 -Leaf).Split('.')[0] + "_$version" }
#Get Current Time/Date
$date = Get-Date -Format "MM-dd-yyyy_HH-mm-ss"
#Log Files
$loginstall = "$env:SystemDrive\TST_Logs\$SWName\$SWName"+"_$date"+"_install.txt"
$logname = "$env:SystemDrive\TST_Logs\$SWNAme\$SWName"+"_$date.txt"
Start-Transcript $logname
#Installing Chrome based on architecture
if ( ( (Get-WmiObject -Class Win32_OperatingSystem | select *).OSArchitecture) -eq "64-bit")
{
Write-Host "Installing Google Chrome x64" -ForegroundColor Green
if ( ((Start-Process $installer_x64 -ArgumentList "/qn /l ""$loginstall"" " -Wait -Passthru).ExitCode) -eq "0")
{
Write-Host "Installer completed successfully" -ForegroundColor Green
}
else { Write-Host "Please check log file for error messages" -ForegroundColor Green }
}
else
{
Write-Host "Installing Google Chrome x32" -ForegroundColor Green
if ( ((Start-Process $installer_x86 -ArgumentList "/qn /l ""$loginstall"" " -Wait -Passthru).ExitCode) -eq "0")
{
Write-Host "Installer completed successfully" -ForegroundColor Green
}
else { Write-Host "Please check log file for error messages" -ForegroundColor Green }
}
Stop-Transcript
PowerShell Script to Create and Copy a File
##### ONLY UPDATE the $File VARIABLE #####
#File to copy
$File = "localUser.conf"
##### DO NOT MODIFY THE CODE BELOW #####
#Package Name for logs folder creation
$SWName = "CopyFiles"
#Get Current Time/Date
$date = Get-Date -Format "MM-dd-yyyy_HH-mm-ss"
#Log Files
$logname = "$env:SystemDrive\TST_Logs\$SWName"+"_$date.txt"
Start-Transcript $logname
#Create Folders
Write-Host "Creating folder under $env:APPDATA" -ForegroundColor Green
New-Item -Path "$env:APPDATA" -Name "Telecom\Config File\1.0" -ItemType Directory
#Copy the File to the folder
Write-Host "Copying $File to destination folder under $env:APPDATA" -ForegroundColor Green
Copy-item $File -Destination "$env:APPDATA\Telecom\Config File\1.0\" -Force
Stop-Transcript
PowerShell Command to Unzip a File
##### ONLY UPDATE the $installer and $version VARIABLES #####
#App exe/msi/zip Installer from the Install Files Tab
$installer = "App.zip"
$version = "1.1.1.1"
##### DO NOT MODIFY THE CODE BELOW #####
#Package Name for logs folder creation
$SWName = (Split-Path $installer -Leaf).Split('.')[0] + "_$version"
#Get Current Time/Date
$date = Get-Date -Format "MM-dd-yyyy_HH-mm-ss"
#Log File
#$loginstall = "$env:SystemDrive\TST_Logs\$SWName\$SWName"+"_$date"+"_install.txt"
$logname = "$env:SystemDrive\TST_Logs\$SWNAme\$SWName"+"_$date.txt"
Start-Transcript $logname
#Copy the zip file to Temp
Write-Host "Copying $installer to $env:TEMP" -ForegroundColor Green
Copy-Item $installer -Destination $env:TEMP -Force
#Unzip file
Write-Host "Unzipping $installer" -ForegroundColor Green
Expand-Archive $installer -DestinationPath "$env:LOCALAPPDATA\Programs\"
#Removing Zip file
Write-Host "Removing $installer from $env:TEMP" -ForegroundColor Green
Remove-Item "$env:TEMP\$installer" -Force
Stop-Transcript
PowerShell AEP ReadMe File Creation
#Enabling VisualBasic Assembly
Add-Type -AssemblyName Microsoft.VisualBasic
#Get Current Time/Date
$date = Get-Date -Format "MM-dd-yyyy_HH-mm-ss"
#Logfile
$logname = "$env:SystemDrive\TST_Logs\ReadMe_Log"+"_$date.txt"
Start-Transcript $logname
#ReadMe Save Location
$readme = "$env:USERPROFILE\Downloads\ReadMe.txt"
#Vendor App Download URL
$vendorURL = [Microsoft.VisualBasic.Interaction]::InputBox('Please enter the Vendor App Download URL:', 'Vendor App Download URL')
#Select file name
Write-Host "Select the exe/msi file" -ForegroundColor Green
[System.Reflection.Assembly]::LoadWithPartialName("System.windows.forms") | Out-Null
$app = New-Object System.Windows.Forms.OpenFileDialog
$app.initialDirectory = $initialDirectory
$app.filter = "All files (*.*)| *.*"
$app.ShowDialog() | Out-Null
#Software details
$DisplayName = (Get-ItemProperty $app.FileName).VersionInfo.FileDescription
$msiexe = $app.SafeFileName
#Getting file version
Write-Host "Obtaining version for $msiexe" -ForegroundColor Green
$version = (Get-ItemProperty $app.FileName).VersionInfo.FileVersion
#Obtaining Certificate trusted
Write-Host "Checking if Certificate is Trusted for" $app.SafeFileName -ForegroundColor Green
if ((Get-AuthenticodeSignature $app.FileName).status -eq "Valid")
{
$trustcert = "True"
}
else { $trustcert = "No" }
#Obtaining "Issued to"
Write-Host "Obtaining Certificate Issued To for" $app.SafeFileName -ForegroundColor Green
$certissuedto = (((Get-AuthenticodeSignature $app.FileName).SignerCertificate.Subject -split ',*..=')[1]) -replace """"
#Obtaining Certificate Thumbprint
Write-Host "Obtaining Certificate Thumbprint for" $app.SafeFileName -ForegroundColor Green
$certthumb = (Get-AuthenticodeSignature $app.FileName).SignerCertificate.Thumbprint
#Creating ReadMe File
$cmdline = $app.FileName
if ($cmdline -like "C:\Program Files*")
{
$PerUser = "No"
}
else { $PerUser = "Yes" }
#$PerUser =[Microsoft.VisualBasic.Interaction]::MsgBox('Per User Install?', 'YesNo', 'Per User Install?')
#Creation of ReadMe file
Write-Host "Creating ReadMe file for" $app.SafeFileName -ForegroundColor Green
"** Application Version: **
$version
** Application Download Link: **
$vendorURL
If you would like to create your packages or modify/upgrade existing ones with ease, feel free to access our
***Full Guide to Software Packages (Creating & Editing)***
>>>>>>>>> https://kb.thinscale.com/management-platform-knowledge-base/full-guide-to-software-packages <<<<<<<<<
---------------------------------------------------------------------------------------------------------------
To allow access from within SRW/TK session, please add the below parameters to your profile:
---------------------------------------------------------------------------------------------------------------
Please open the profile editor, and go to:
Applications > Local Applications > Add > Custom Application
Per User install: $PerUser
Display Name: $DisplayName
Command Line: $cmdline
---------------------------------------------------------------------------------------------------------------
It is critical for the system security to use AEP rule. Below is the recommended configuration for this app.
Additional conditions can only strengthen the level of protection:
---------------------------------------------------------------------------------------------------------------
AEP Rules (Allow)
Certificate Trusted is: $trustcert
AND Certificate Issued To Is: $certissuedto
AND Certificate Thumbprint Is: $certthumb
---------------------------------------------------------------------------------------------------------------
Please reach out to ThinScale Support at Support@thinscale.com if you are having issues with this software package.
Please note: If you want to change the icon of the package, make sure the file name is package.ico and the size is 32x32" | Out-File -FilePath $readme
$okcancel = [Microsoft.VisualBasic.Interaction]::MsgBox("ReadMe saved to $readme", 'OKCancel', 'ReadMe Save Location'),[System.Diagnostics.process]::Start("explorer.exe","$env:HOMEPATH\Downloads")
Stop-Transcript
WARNING: When opening the ReadMe.txt file under Optional Configuration AEP Rules, please confirm the "Certificate Issued To Is" option has no extra characters like a blank space, double quotes, or an ending comma, as any of these extra characters can impact the performance of AEP in the profile.
PowerShell to Install a Certificate on the Machine
INSTALL THE CERTIFICATE ON THE MACHINE ITSELF
##### ONLY UPDATE the $installer, $cert1 and $cert2 VARIABLES #####
#App exe/msi Installer from the Install Files Tab
$installer = "Telecom Certificates Install Logs.tst"
$cert1 = "Telecom-Main.cer"
$cert2 = "Telecom-Root.cer"
##### DO NOT MODIFY THE CODE BELOW #####
#Package Name for logs folder creation
$SWName = (Split-Path $installer -Leaf).Split('.')[0]
#Get Current Time/Date
$date = Get-Date -Format "MM-dd-yyyy_HH-mm-ss"
#Log File
$logname = "$env:SystemDrive\TST_Logs\$SWNAme\$SWName"+"_$date.txt"
Start-Transcript $logname
#Importing Certificates:
Write-Host "Importing Certificates" -ForegroundColor Green
# Checking if CA Cert is installed
$Cert1Loc = "HKLM:\SOFTWARE\Microsoft\SystemCertificates\CA\Certificates\FD8483303400982423ACEAB4C924C6F0DDA368DB"
if (Test-Path $Cert1Loc)
{
Write-Host "Certificate $cert1 already installed, nothing to do." -ForegroundColor Green
}
else
{
Write-Host "Certificate $cert1 not installed, installing" -ForegroundColor Green
Import-Certificate $cert1 -CertStoreLocation Cert:\LocalMachine\CA
}
# Checking if ROOT Cert is installed
$Cert2Loc = "HKLM:\SOFTWARE\Microsoft\SystemCertificates\ROOT\Certificates\DA5F1D263EC62B5AD6DD9284EFE218EDF0EE749B"
if (Test-Path $Cert2Loc)
{
Write-Host "Certificate $cert2 already installed, nothing to do." -ForegroundColor Green
}
else
{
Write-Host "Certificate $cert2 not installed, installing." -ForegroundColor Green
Import-Certificate $cert2 -CertStoreLocation Cert:\LocalMachine\Root
}
# Checking if Certificates installed successfully
if ( (Test-Path $Cert1Loc) -and (Test-Path $Cert2Loc) )
{
Write-Host "Certificates installed successfully" -ForegroundColor Green
}
else { Write-Host "Please check logs to troubleshoot" -ForegroundColor Green }
Stop-Transcript
PowerShell Script to Modify the Hostfile
##### HOSTS VARIABLES #####
$entry1 = "`serveraddress.com server-01"
$entry2 = "`1.1.1.1 andromeda-01"
##### DO NOT MODIFY THE CODE BELOW #####
#Get Current Time/Date
$date = Get-Date -Format "MM-dd-yyyy_HH-mm-ss"
#Log Files
$logname = "$env:SystemDrive\TST_Logs\HostsFile"+"_$date.txt"
Start-Transcript $logname
# Getting content of of hostsfile
Write-Host "Getting content of the hosts file" -ForegroundColor Green
$hosts = (Get-Content $env:windir\System32\drivers\etc\hosts -Raw)
# Checking for entry1
if ( $hosts.Contains("serveraddress.com") )
{
Write-Host "$entry1 exists already" -ForegroundColor Green
}
else
{
Write-Host "Adding $entry1 to hosts file" -ForegroundColor Green
Add-Content -Path $env:windir\System32\drivers\etc\hosts -Value $entry1 -Force
}
# Check for entry2
if ( $hosts.Contains("1.1.1.1") )
{
Write-Host "$entry2 exists already" -ForegroundColor Green
}
else
{
Write-Host "Adding $entry2 to hosts file" -ForegroundColor Green
Add-Content -Path $env:windir\System32\drivers\etc\hosts -Value $entry2 -Force
}
Stop-Transcript
VBScript in Silence Mode
On Error Resume Next
Set objShell = CreateObject("WScript.Shell")
objShell.Run "msiexec.exe /i software.msi /qn", 0, True
WScript.Quit()
VBScript to copy a file
' VBScript.
Dim FSO
Set FSO = CreateObject("Scripting.FileSystemObject")
' Create a new folder
FSO.CreateFolder "C:\Telecom"
If (FSO.FileExists("C:\Telecom\img.png")) Then
WScript.Quit()
Else
FSO.CopyFile "img.png", "C:\Telecom\img.png"
End If
WScript.Quit()
VBScript to Call PowerShell Script
On Error Resume Next
Set shell = CreateObject("WScript.Shell")
shell.run ("powershell -executionpolicy bypass .\Install.ps1"), 0, True
VBScript to install a root certificate
Const CertStoreLocation = "Root"
Set objFSO = CreateObject("Scripting.FileSystemObject")
Set objFile = objFSO.OpenTextFile("CERTIFICATE.cer", 1)
strCert = objFile.ReadAll
objFile.Close
Set objShell = CreateObject("WScript.Shell")
objShell.Run "certutil -addstore " & CertStoreLocation & " " & strCert, 0, True
WScript.Echo "Certificate installed successfully."
List of environment variables in Windows 10/11
| %APPDATA% | C:\Users\<username>\AppData\Roaming |
| %ALLUSERSPROFILE% | C:\ProgramData |
| %CD% | Typing in this command will give you the current directory you are working in. |
| %COMMONPROGRAMFILES% | C:\Program Files\Common Files |
| %COMMONPROGRAMFILES(x86)% | C:\Program Files (x86)\Common Files |
| %COMMONPRGRAMW6432% | C:\Program Files\Common Files |
| %CMDEXTVERSION% | This variable expands to the version of the command-line extensions. |
| %COMSPEC% | C:\Windows\System32\cmd.exe |
| %DATE%: | This variable will give you the current date according to date format preferences. |
| %ERRORLEVEL% | Determines the error level set by last executing command. |
| %HOMEDRIVE% | C:\ |
| %HOMEPATH% | C:\Users\<username> |
| %LOCALAPPDATA% | C:\Users\<username>\AppData\Local |
| %LOGONSERVER% | \\<domain_logon_server> |
| %PATH% | C:\Windows\system32;C:\Windows;C:\Windows\System32\Wbem |
| %PATHEXT% | .com;.exe;.bat;.cmd;.vbs;.vbe;.js;.jse;.wsf;.wsh;.msc |
| %PROGRAMDATA% | C:\ProgramData |
| %PROGRAMFILES% | C:\Program Files |
| %PROGRAMW6432% | C:\Program Files |
| %PROGRAMFILES(X86)% | C:\Program Files (x86) |
| %PROMPT% | $P$G |
| %SYSTEMDRIVE% | C: |
| %SYSTEMROOT% | C:\Windows |
| %TIME% | Similarly, it gives you current time according to the time format preferences. |
| %TMP% | C:\Users\<username>\AppData\Local\Temp |
| %TEMP% | C:\Users\<username>\AppData\Local\Temp |
| %USERNAME% | <username> |
| %USERPROFILE% | C:\Users\<username> |
| %USERDOMAIN% | Userdomain associated with current user. |
| %USERDOMAIN_ROAMINGPROFILE% | Userdomain associated with roaming profile. |
| %WINDIR% | C:\Windows |
| %PUBLIC% | C:\Users\Public |
| %PSMODULEPATH% | %SystemRoot%\system32\WindowsPowerShell\v1.0\Modules\ |
| %ONEDRIVE% | C:\Users\<username>\OneDrive |
| %DRVERDATA% | C:\Windows\System32\Drivers\DriverData |
| %CMDCMDLINE% | Outputs command line used to launch the current Command Prompt session. (Command Prompt.) |
| %COMPUTERNAME% | Outputs the system name. |
| %PROCESSOR_REVISION% | Outputs processor revision. |
| %PROCESSOR_IDENTIFIER% | Outputs processor identifier. |
| %PROCESSOR_LEVEL% | Outputs processor level. |
| %RANDOM% | This variable prints a random number from 0 through 32767 |
| %NUMBER_OF_PROCESSORS% | Outputs the number of physical and virtual cores. |
| %OS% | Windows_NT |