Full Guide to Secure Remote Worker Troubleshooting
SRW can't install launch or switch profiles. This article will guide you on what to check on the OS.
The Secure Remote Worker (SRW) workspace is fully compatible with both the Home and Professional editions of Windows 10 and 11. When users experience challenges with the application's installation, launch, or Windows profile transition, it becomes imperative for the IT Help Desk to engage in a comprehensive diagnostic process on the agent's computer. This intervention aims to pinpoint any unique discrepancies affecting the system's performance. It is critical to acknowledge that Bring Your Own Device (BYOD) systems are characterized by a lack of uniformity across the devices owned by the corporation. This divergence from standardized practices necessitates a tailored approach to troubleshooting. To facilitate a structured and efficient resolution process, we will delineate a series of preliminary areas for examination tailored to the nature of the issue encountered. This directive ensures that all necessary measures are taken to provide the agent with the requisite support, thereby maintaining operational continuity and efficiency.
MachineInfo Common Errors
Quick Access to the KB Machine Common Errors.
TROUBLESHOOTING SESSION
SCENARIO 1: SRW Can't Install
To ensure the seamless operation of the Secure Remote Worker (SRW) platform, verifying that the agent's machine meets the specified pre-requirements is essential. Please consult the Knowledge Base on the SRW Requirements page for comprehensive details. Hardware specifications must be carefully considered, particularly ensuring that the processors are not ARM-based. The installed .NET version and the hardware configuration should be reviewed to confirm compatibility. Lastly, the Windows operating system must be fully updated with the latest patches to maintain security and functionality.
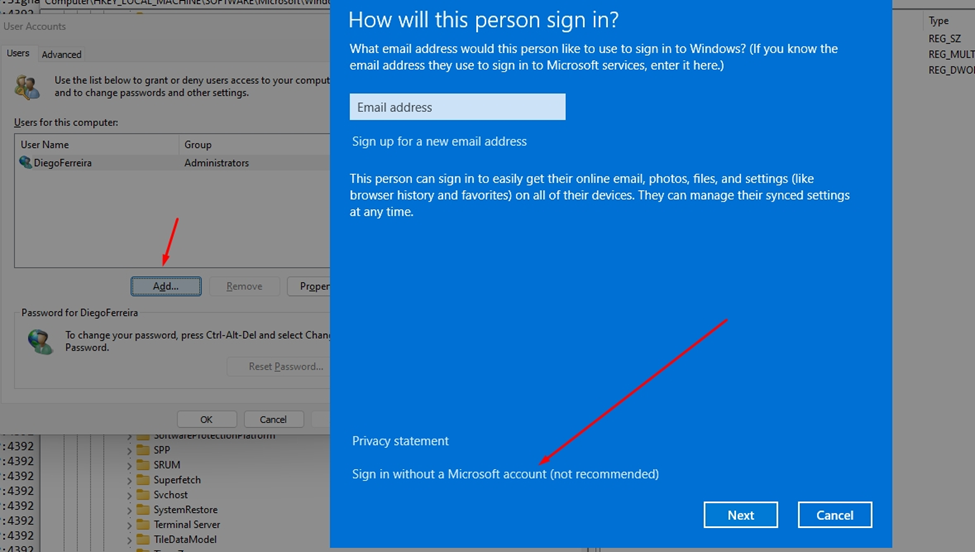
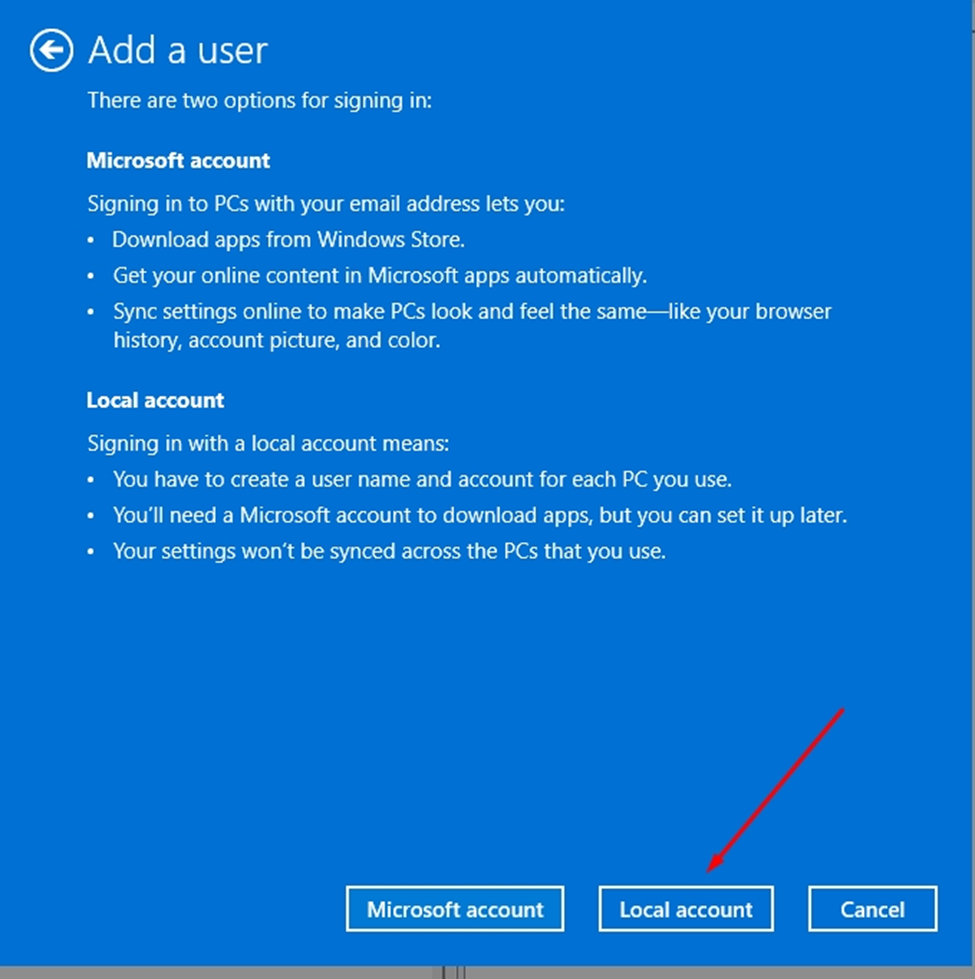
A local admin account is required. If the agent doesn't have one, please create a local admin account, reboot the computer, sign in to the new Windows account, and start the installation from there.
STEP 1: WIN KEY + R. Open the Run and execute: netplwiz
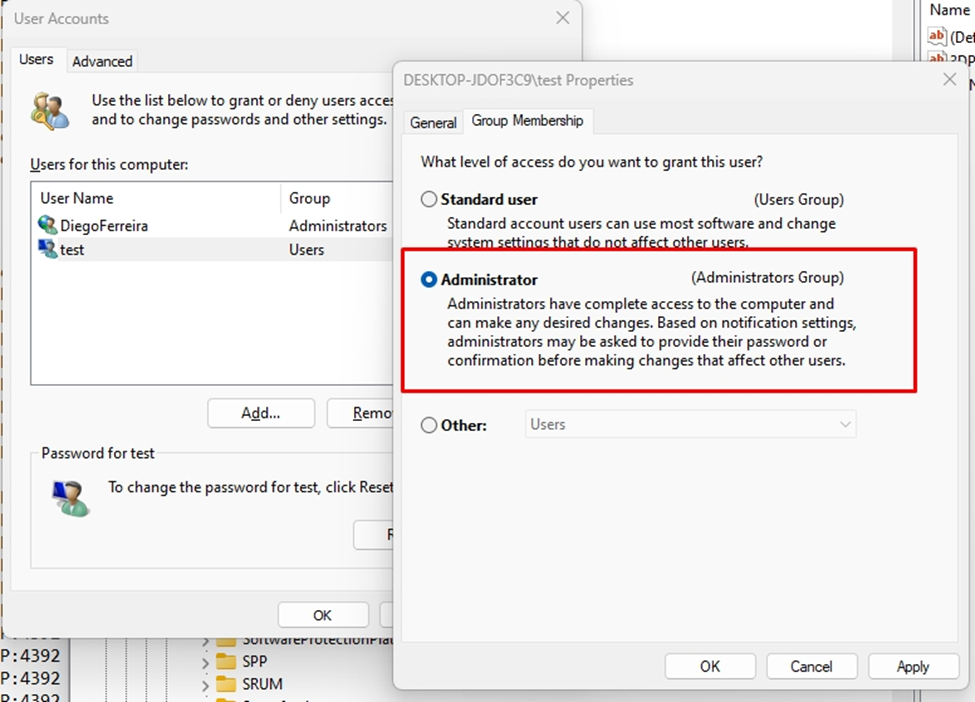
If the primary account doesn't have a password, please add a password and create a new local account with administrator permission and password. After creating the account, open it and change the group membership to "Administrator."
SCENARIO 2: SRW Can't Register
→ Check if your ThinScale server is running with a valid SSL certificate. An expired certificate or server down will block registration.

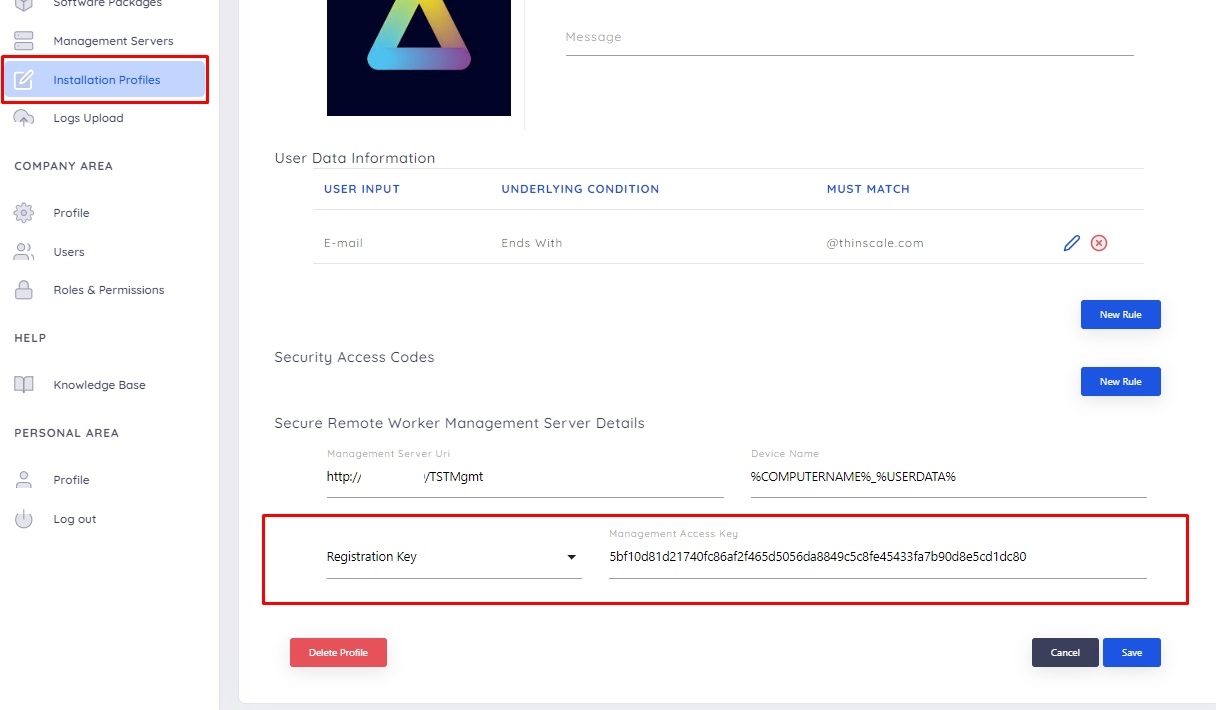
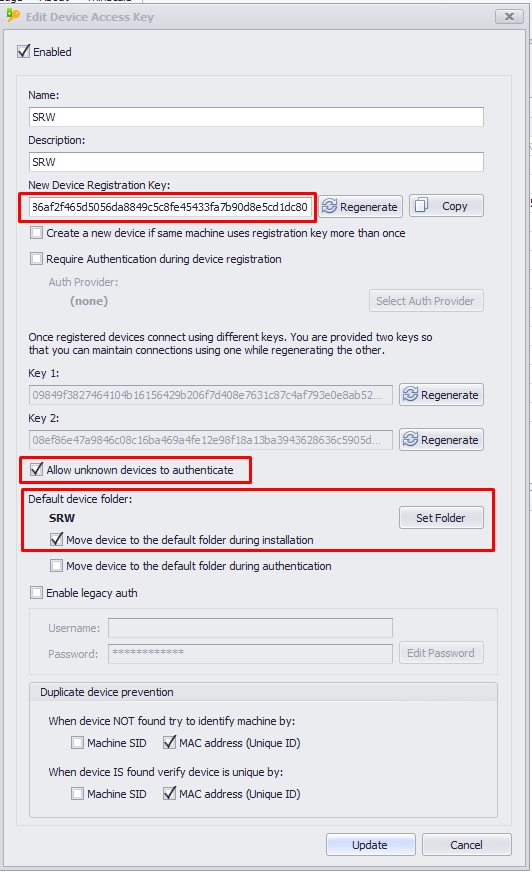
→ When using a SCI (Single Click Install) created on “Installation Profiles” at https://my.thinscale.com/. Verify if the Access Keys string matches with the AK from your console and redirects to the correct folder with the assigned profile. Also, the Access Keys must have the option “Allow unknown devices to authenticate” enabled.
→ There is no expired license, and enough seats available.
→ The SQL database has enough space available.
If all options fail to register the Secure Remote Worker, please refer to this KB Retrieve SRW Logs, collect the logs manually from the agent's computer, and share them with the ThinScale Support Team for analysis.
SCENARIO 3: SRW Can't Start
Upon attempting to launch the Secure Remote Worker application, an error message "We were unable to start Secure Remote Worker" is encountered.
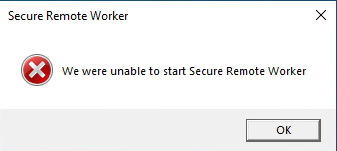
This error is indicative of a dependency on the "TSTService.exe" service, which is expected to run from the path "C:\Program Files (x86)\SRW\TSTService64.exe."
To address this issue, the following steps are recommended:
STEP 1: Verify if the Secure Remote Worker service is running. This can be done by accessing the Windows Services management console and checking the status of the "TSTService.exe" service, which shows as “Secure Remote Worker Machine Service” in the Services MMC. If it is not running, attempt to start the service manually.
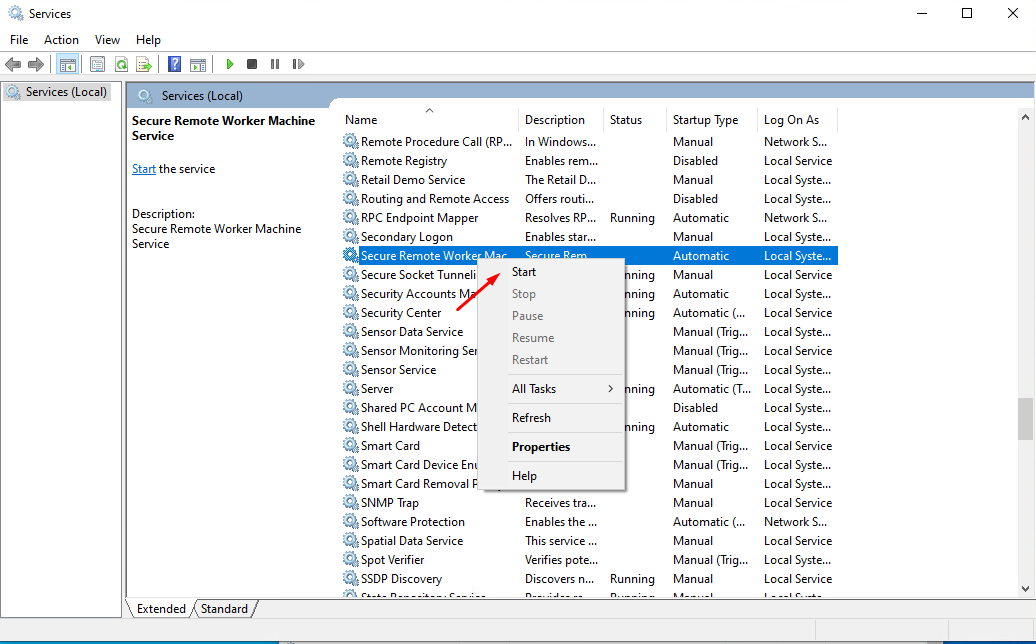
STEP 2: If difficulties persist in starting the service or if the error message continues to be displayed, it is advisable to revisit the SRW Requirements in the Knowledge Base. Ensure the machine meets all the specified requirements and is fully patched with the latest Windows updates to prevent compatibility issues.
STEP 3: Check the log files for more detailed information regarding the error. The log files are located at "C:\Program Files (x86)\SRW" with the extension *.log. Use the filter option to sift through the logs for relevant entries that may provide insights into the cause of the error. The severity of the error message follows Windows standards, with Information, Warning, and Error levels. The most recent content is at the bottom of the log files, and the oldest is at the top.
SecureRemoteWorkerSetup.log - This log file contains a transcript of the software installation process on the machine. It can be used to verify that all installation steps were completed successfully and to identify any issues that may have occurred during the installation.
TSTService.log - This log is crucial for manifest validation before launching the application. It is expected to encounter .NET blocking issues (except Newtonsoft.Json), but the attention needs to be addressed to local applications that can sometimes interfere with SRW. AV or XDR applications perform service verification, such as SentinelOne and Crowdstrike. If SRW is not in their whitelist, it will show as blocking here on the logs, blocking our ability to run.

These folders must be whitelisted in your XDR or cybersecurity solution:
"C:\Program Files (x86)\SRW"
"C:\ProgramData\SRW"
“C:\TST_Logs”
In this situation, the Newtonsoft.Json is showing in the TSTService log as BLOCKING.
Navigate to the location: C:\Windows\Microsoft.NET\assembly\GAC_MSIL\Newtonsoft.Json\ and rename the folder to Newtonsoft.Json.old. After that, reboot the computer.
TSTServiceBS.log - This log file is used to validate communication. A perfect log file would appear as depicted in the provided picture.

MachineService.log - This is the primary log file you will refer to most often, as it contains all the information from when the SRW is launched. A MachineService.log_old file indicates that our service TSTService.exe or computer has been restarted, prompting the application to rename the current logs to *.log_old and start a new log file. Please check this KB about Machine Service Common Errors.
UILog-XXXXXX.log - These logs pertain to the user interface (UI) interactions during the session.
TKBarLog-XXXXXX.log - This log captures information about the KioskBar during the session.
TKInitLog-XXXXX.log - This log contains information regarding the startup actions from the auth provider, access policies, profile configuration, and other admin actions coming from the console.
If all options fail to start the Secure Remote Worker, please refer to this KB Extract All Logs and System to run the script on the agent's computer and submit the zip file created on the desktop and a copy of your current profile Import/Export Profile to the ThinScale Support Team for analysis.
SCENARIO 4: SRW Won't Switch Profiles on Windows
At this stage of the Secure Remote Worker (SRW) application's operation, the software successfully launches, performs the authentication provider validation, runs the access policies if required, and logs off from the Windows account. However, if the SRW is unable to start the SRW Windows account, resulting in a return to the Windows logon page or displaying an error message:
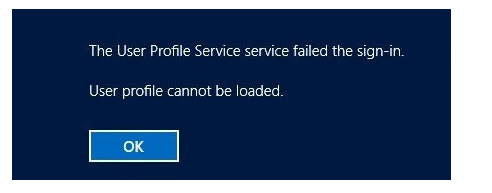
The following steps should be taken to troubleshoot the issue:
STEP 1: Check the MachineService.log for any clue about what's causing the error. Please check this KB about Machine Service Common Errors.
https://kb.thinscale.com/secure-remote-worker-knowledge-base/machine-service-common-errors
STEP 2: Please navigate to the registry and make sure nothing is after ", " the comma from the Value data. If yes, go ahead and delete it.
HKEY_LOCAL_MACHINE\SOFTWARE\Microsoft\Windows NT\CurrentVersion\Winlogon
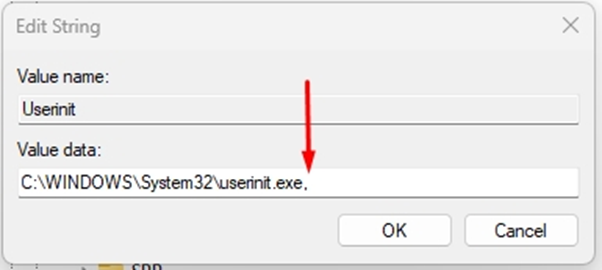
Identifying what service is taking over the Userinit is essential because the application will likely add value again. If you are running Application Execution Prevention, you must whitelist that application in your profile. The downside is you are whitelisted all across the board in your environment, not only on this agent's computer. Please analyze it further before global whitelisting.
STEP 3: Ensure the machine is not domain-joined or enrolled in the Windows Insider Program. When the BYOD is domain joined to Azure, please consider that it can interfere with switching profiles even when you are not pushing group policy.

STEP 4: Windows Updates is patching pending (waiting for a reboot to apply), especially on the .NET application.
STEP 5: Check if you have empty profile keys on the registry and delete those. It should have only the Windows user's account and Windows services. Location: HKEY_LOCAL_MACHINE\SOFTWARE\Microsoft\Windows NT\CurrentVersion\ProfileList


STEP 6: WIN KEY + R. Open the Run and execute: netplwiz
If the primary account doesn't have a password, please add a password and create a new local account with administrator permission and password. After creating the account, open it and change the group membership to "Administrator."


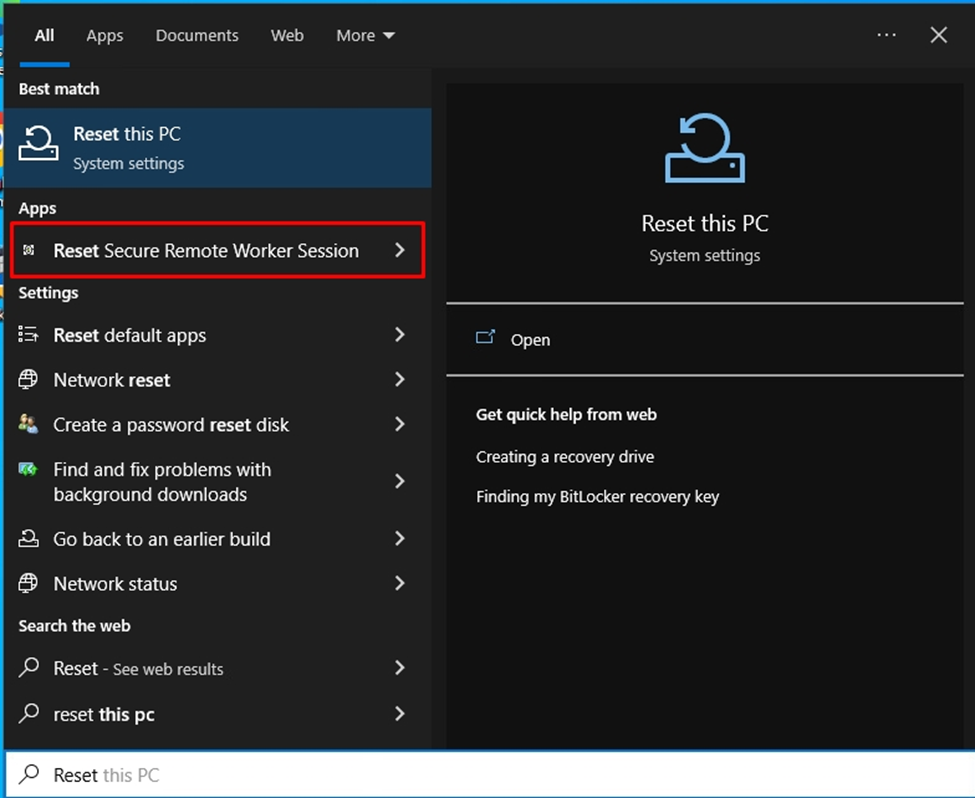
STEP 7: Please navigate to the Windows search function, locate Reset Secure Remote Worker Session, and click on it. It will delete the SRW user folder from the machine and any information stored inside the Dual Persona and/or Temporary Storage and any per-user apps (e.g., Teams).
STEP 8: Reboot the machine. Sign in using the newly created Windows account and try to open the SRW.
STEP 9: Always run the latest Secure Remote Worker (SRW) version. You can download the latest version at ThinScale Portal (my.thinscale.com). Please refer to KB Full Guide to Upgrade Server, Console, and End-Points to learn more about how to do it.
If all options fail to launch the Secure Remote Worker, please refer to this KB Extract All Logs and System to run the script on the agent's computer and submit the zip file created on the desktop and a copy of your current profile Import/Export Profile to the ThinScale Support Team for analysis.
SCENARIO 5: SRW Uninstall
A. Please remove the software through the Control Panel. In the situation where the MSI services are corrupted on the agent's computer. Microsoft has published an article with a tool to help repair it to remove/add applications.
Microsoft link: https://support.microsoft.com/en-us/topic/fix-problems-that-block-programs-from-being-installed-or-removed-cca7d1b6-65a9-3d98-426b-e9f927e1eb4d
The Secure Remote Worker creates the following folders on the computer:
C:\Program Files (x86)\SRW
C:\ProgramData\SRW
C:\Users\SRW
The registry key: HKEY_LOCAL_MACHINE\SOFTWARE\WOW6432Node\ThinKiosk
ATTENTION:
Every time a registry key is created or deleted. Requires to reboot the machine.
B. If it's the case that SRW files were manually deleted without completing a full uninstall, if a regular uninstall attempt is made afterward, you may receive a message similar to the one below, stating that a needed file is missing:

To remedy this, you can first restore those files so that a regular uninstall can be completed successfully.
- First, download the specific MSI to match the version of SRW the end user is using from the my.thinscale.com →Product Downloads page. You can use the drop-down to get the specific version needed:

- Then, extract the .msi from the download and put it in a folder of your choosing.
- Launch CMD as admin, and navigate to the folder you put the download in
- Please modify the command below to replace the .msi with the specific .msi version you downloaded, then run it:
msiexec /a SecureRemoteWorkerClient-7.x.x.msi targetdir="C:\Program Files (x86)\SRW"
- Now the files should be available for you to complete a regular uninstall for SRW via Control Panel