ThinScale Management Console Admin Guide - Device Policies
This article will describe the devices policies of the Management Console.
DEVICE POLICIES
Device Policies encompass the comprehensive configuration settings required for our latest v8 ThinScale Desktop Agent (TDA). You can define configurations such as Modes, Device Login Preferences, Branding, and additional settings within these device policies.
OPERATING MODE

With the new TDA, it becomes feasible to seamlessly switch between SRW and TK modes without reinstalling the client. You can effortlessly modify the mode and then restart the client.
DEVICE LOGIN OPTIONS
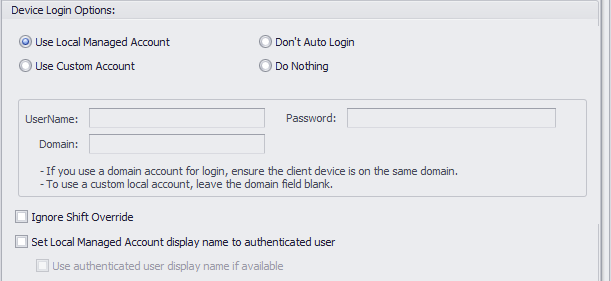
Note: Device Login Preferences are relevant only when operating in TK Mode.
Use local Managed Account
The device will auto-login using a local account, ‘TDA,’ created by TDA. This user is a low-privileged user account.
Use Custom Account
The device will auto-login using the credentials supplied in the Username / Password and Domain fields. If the device is domain-joined, this can be an alternate local or domain account.
Don't Auto Login
Disables any configured auto-login settings.
Do Nothing
TDA will not apply or remove any auto-login configuration. If the device already has auto-login configuration applied or this configuration is delivered by other means, it will remain in place.
Ignore Shift Override
Prevents the left shift key from overriding the auto-login configuration.
Set Local Managed Account Display Name to an authenticated user
If enabled, the display name while login to the machine will be set using the username typed in the Authentication Provider screen.
REMOTE LOGINS

As noted above, please only enable Remote Session Logins for testing and demo purposes only since it involves allowing Remote Desktop Protocol to the device. It's recommended to have a separate Device Policy for the testing/demo/troubleshooting purposes if you need to enable Remote Logins for select device(s).
If enabled, if you already have access to an account that can RDP into a machine, the Remote Login setting allows continuing to RDP as TDA is launched into the session.
Password policy:
-Please create a complex secure password. Note if you have a domain policy specifying password complexity, those complexity rules will also apply.
-If you are using a Session Password and having the user define the password for each session, that password will instead be used for Remote Login if Remote Login is enabled. This password will also need to follow domain password complexity rules if they are present.
Specific process:
- If you begin with a RDP session into the machine you are controlling, as it switches Windows accounts you will get logged out.

- However, if you have Remote Login enabled, the loading page will notify you of the specific username to use for RDP once the TDA session loads, e.g. TDA5 is the example shown below:

- Wait for the session to finish loading, e.g. if certain software packages need to install first, please allow them appropriate time. Put in the corresponding username into your RDP connection window and then it should let you into the TDA session via RDP:

GENERAL

Cache Configuration
If enabled, profiles assigned to the Device folder will be saved and encrypted locally.
Please note there are two locations:
ProgramData\TDA\DeviceData\devicedata.cache
HKEY_LOCAL_MACHINE\SOFTWARE\ThinScale\TDA\DeviceGroupConfiguration
Local Managed Account Per Profile
If enabled, TDA will create a separate Windows User Profile per profile assigned to the device folder.
Local Managed Account Per Authentication User
If enabled, TDA will create a separate Windows User Profile for every logged-in user using the Authentication Provider.
Disable Folder Integrity Check
If enabled, the TDA will not check for the integrity of its Core Modules folders.
It's not recommended to be disabled, mainly if you use SRW Mode.
Hide Splash Screen
If enabled, the TDA will hide the loading of its initial UI screen unless a user input is required.
BRANDING AND SHORTCUT
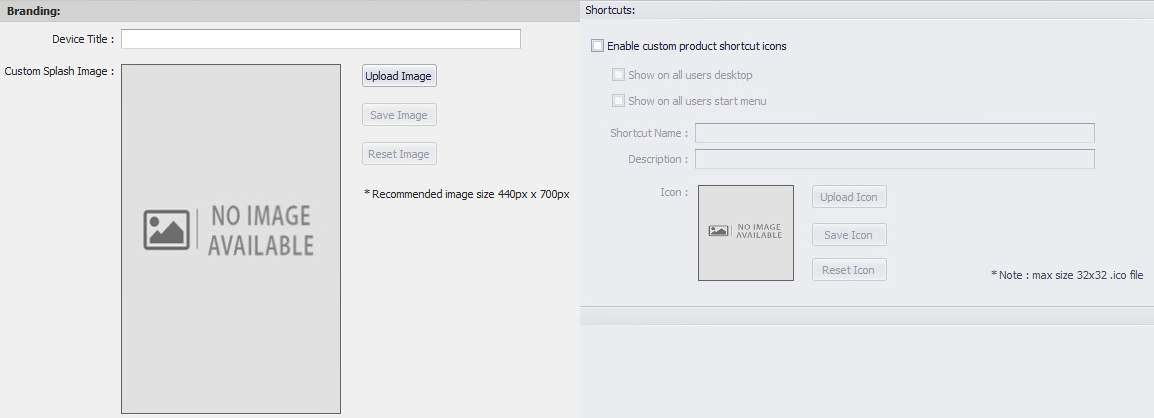
With the introduction of v8, TDA enables you to effortlessly configure custom splash screen images and personalized desktop icons directly through the Management Console. Upload your desired image within the device policy, use a .ico file for the desktop shortcut, and your customization is complete.
STARTUP SCRIPT
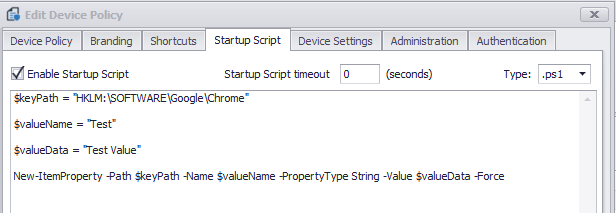
Enable Startup Script
Enables the supplied .VBS, .BAT or .PS1 startup script. The script is configured as a local group policy start-up script and will apply during the Windows boot process.
Startup Script Timeout
Determines how long the scripts will run before stopping their execution.
DEVICE SETTINGS
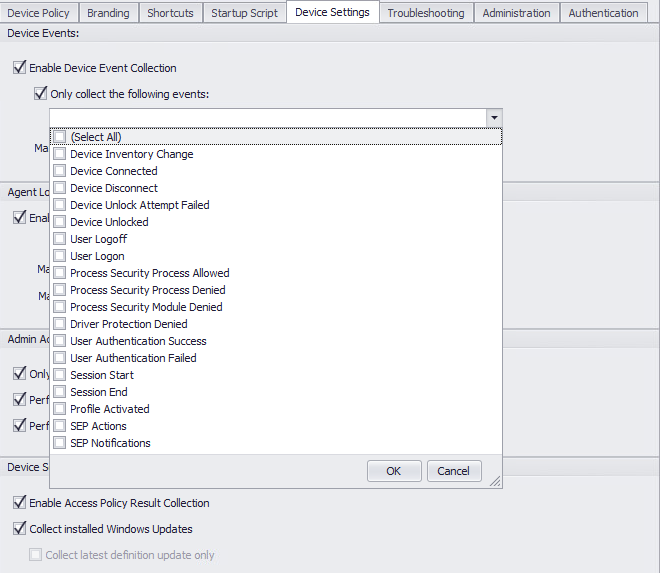
Inside the device settings tab, you can configure all the options for Device Logs. This includes the ability to choose the events of most tremendous significance.
TROUBLESHOOTING
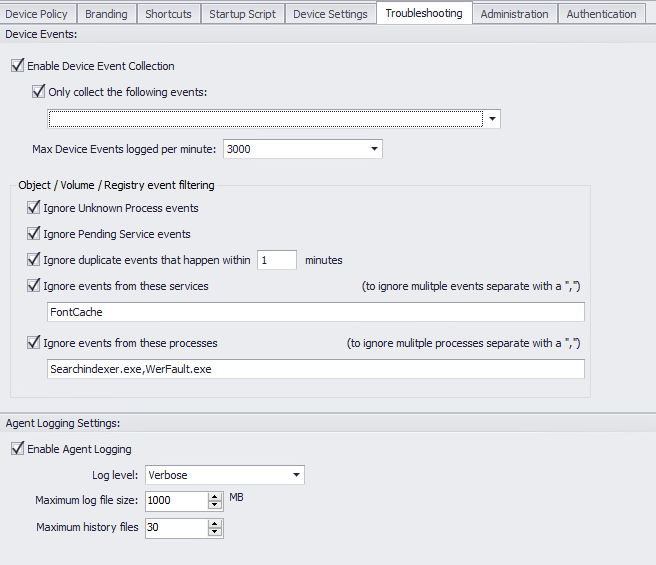
Troubleshooting mode is another powerful new feature that allows for collecting vast amounts of information for a predefined amount of time. When an issue occurs, this mode will provide significant insight into events to help identify the root cause faster.
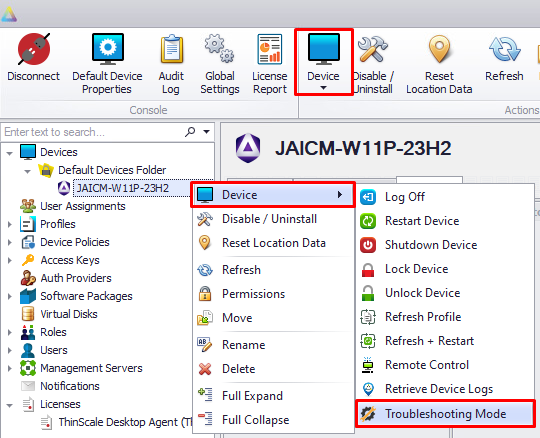
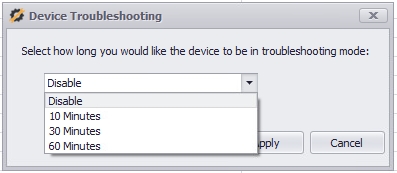
To enable it, we would go the same way as performing other available device actions: Right-click on a device -→ "Troubleshooting Mode", and select one of the options presented with 10, 30, or 60 minutes timeframe.
AGENT LOGGING SETTINGS

Enable Agent Logging
If left unchecked, the agent will collect all log levels (Info to Critical). If checked, the log level needs to be selected as required.
ADMIN ACTIONS

Only allow device action when in secure session
If enabled, Restart and Profile Refresh actions will only be performed when the TDA session is active.
Perform device actions silently
If enabled, Restart and Profile Refresh will be performed silently without user consent.
Perform device actions if no user response is received
If enabled, Restart and Profile Refresh will be performed only when the user fails to accept or deny the request.
ADMINISTRATION

Here is where you can set the unlock password for the TDA client. Additionally, you can deactivate the unlock key hotkey (Ctrl-Alt-U) to require an unlock through the Management Console exclusively.
AUTHENTICATION
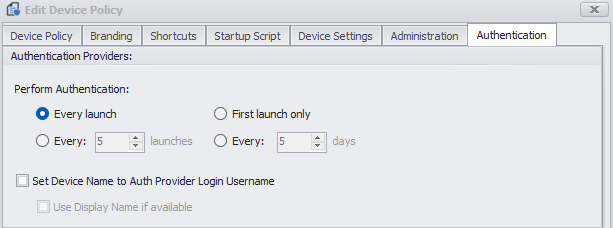
Here is where you have the option to control the behavior of the Authentication Provider screen.
You can also set the option to rename the device connected to the server with the username typed in the Auth Provider screen.